pre-sales consultations in the chat
1-6 PM (GMT+3)


Domain Check:

pre-sales consultations in the chat
1-6 PM (GMT+3)
Domain Check:
![]()
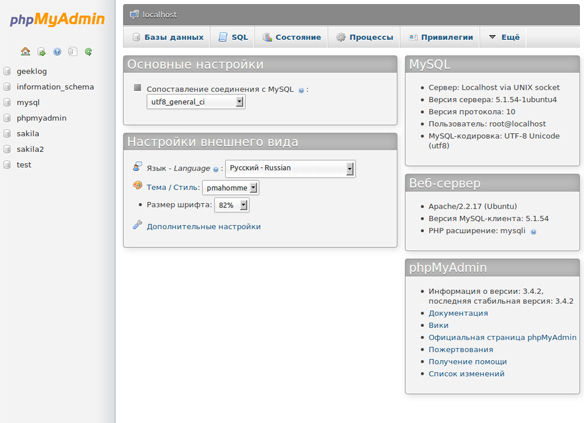
While working in phpMyAdmin, you should keep in mind that the login features may vary depending on the tools used, the operating system, and the development environment (CMS). Let's look at the basic options.
Attention!!! If you don’t know how to quickly and easily log in to phpMyAdmin on localhost, there is an available and the fastest option: save the link directly in your browser and you can always access the control panel. The direct link for versions 4 and 5: http://localhost/openserver/phpmyadmin/. The way works when the environment is properly configured.
Depending on which virtual shared hosting вы выбрали, вход в панель управления может несколько отличаться. However, there are some standard options for Denver in order to get into ISPManager quickly. Once in the control panel, you can create a phpMyAdmin profile. It will also store your login information and root password. All this information is available on the «Server Settings» tab in the «Server Databases» section. If you remember the password and know the username, you can just follow the link in the ISPManager personal account or the standard link http://website_address/myadmin/ to enter the web interface.[/b].
If the databases have been created correctly, you will see a login window where you need to enter the password and username to log in.
If you, as most web masters, prefer to work with Denver and if you don't know how to log in to PHPMyAdmin on Denver, then this tutorial is for you:
Launch Denver via the «Start Denver» shortcut.
Type the address http://localhost.
Seek the address http://localhost/Tools/phpMyAdmin, and click on it to go directly to «phpMyAdmin».
Since most providers automatically create a user account and database for the website while buying a hosting, you will most likely only need to create a user on the local server since the hosting with MySQL right on the hoster's server is already set up.
First, go to the «Privileges» tab on the phpMyAdmin page. Here you can see information on all connected users and accounts. The sequence of actions is as follows:
Add a new user -> enter their details (username and password) -> check all privileges, and click the «GO» banner.
If the registration is successful, you will see a confirmation popup about the new user. And now, working with MySQL and PHP-script will require you to log in with only the authorization data you entered at registration.
You need to navigate the command line and know the stack of basic commands to manage the effective web interface operating.
For example, let's take the most simple and accessible Unix OS version, Ubuntu. There is a standard algorithm of actions to get into phpMyAdmin on Ubuntu 20.04 (the latest stable build):
Install phpMyAdmin from the repository.
Enter the following combinations in the terminal:
sudo apt-get update sudo apt-get install
phpmyadmin php-mbstring php-gettext
The program will offer a choice of several configurations during installation, and you need to choose apache2. The software installation and configuration are carried out completely automatically. All you need to do on your own is to mark the PCP configuration. Enter the following commands in the terminal:
sudo phpenmod mcrypt
sudo phpenmod mbstring
After all the steps, restart the software and analyze the changes made sudo systemctl restart apache2. command.
If the installation is successful, after entering the command https://доменное_имя_или_IP_адрес/phpmyadmin, you will get a login window, where you can enter all the necessary registration data and log in to the web interface.
The operation of phpMyAdmin may vary slightly depending on the CMS.
If you’ve forgotten your password, then the following steps are required to restore access to the hosting with MySQL, as well as the root password:
![]()

A webmaster who works in certain CMSs (WordPress, Joomla, etc.) often has to interact with databases. MySQL DBMS is the most popular database, which works well with PHP. Most websites in Runet are written in this language. Moreover, PHP is one of the most popular languages for the website front-end and back-end programming. There are several ways to access MySQL:
The first method is the best solution for programmers and users who know bash well. The best solution for others is special web interfaces. The most popular option is PhpMyAdmin, which allows you to manage and configure databases through a browser without knowledge of the programming code for that DBMS.
In essence, PhpMyAdmin is an Internet application created for database administration. The application is written in the PHP programming language and has an open-source with the General Public License, which gives everyone the right to use all the web interface features for free.
Its main purpose is to simplify the operation of the database and allow everyone to administer MySQL without learning the programming code. Automation and high security have made this web interface extremely popular among webmasters who work in the Russian-speaking segment of the Internet.